Our group's paper on chitosan/MXene films for UV-shielded food packaging came out in Packaging Technology and Science this year (Munshi et al., 2026). The result is easy to state: add a small amount of Ti3C2Tx MXene to chitosan and the film blocks nearly all UV, gets stronger, fights bacteria, and still breaks down in soil within weeks.
The paper does not show everything that happens between "dissolve chitosan" and "film blocks 99.5% of UV-A". These are the lessons I would give a junior starting their first MXene composite.
1. MXene starts degrading the day you make it
Ti3C2Tx slowly oxidises to TiO2 in water, faster when it is warm, exposed to light or full of dissolved oxygen. A fresh colloid is dark, almost black. One that has turned grey or whitish has partly become titanium dioxide, which no longer behaves like MXene.
So treat MXene like a perishable reagent. Use it soon after making it, store dispersions cold and dark, purge them with argon or nitrogen if you can, and record the date on every vial. If a batch gives strange results, check how old it is before you change your method.
2. Respect the etching chemistry
MXene is made by etching the aluminium layers out of a Ti3AlC2 MAX phase, with hydrofluoric acid or with LiF in hydrochloric acid, which makes HF in the beaker. HF burns are dangerous and are not always painful at first. Read the safety data sheet, keep calcium gluconate gel within reach, use the right gloves, and never work with it alone. No result is worth an injury.
3. Opposite charges help, until they don't
Chitosan only dissolves in dilute acid such as acetic acid, where its amine groups become positively charged (–NH3+). MXene nanosheets carry negative surface groups (–O, –OH, –F). That attraction, together with hydrogen bonding, is why MXene disperses so evenly through the film, as FTIR, FESEM and XRD showed in our study.
The same attraction can also ruin a batch. Pour concentrated MXene into chitosan solution all at once and the sheets can flocculate into clumps before they spread out. Add the dispersion slowly to a well-stirred solution, sonicate gently, and inspect it against the light before casting. A dispersion that looks grainy will give a film that looks grainy.
4. Choose the loading for the job, not the best number
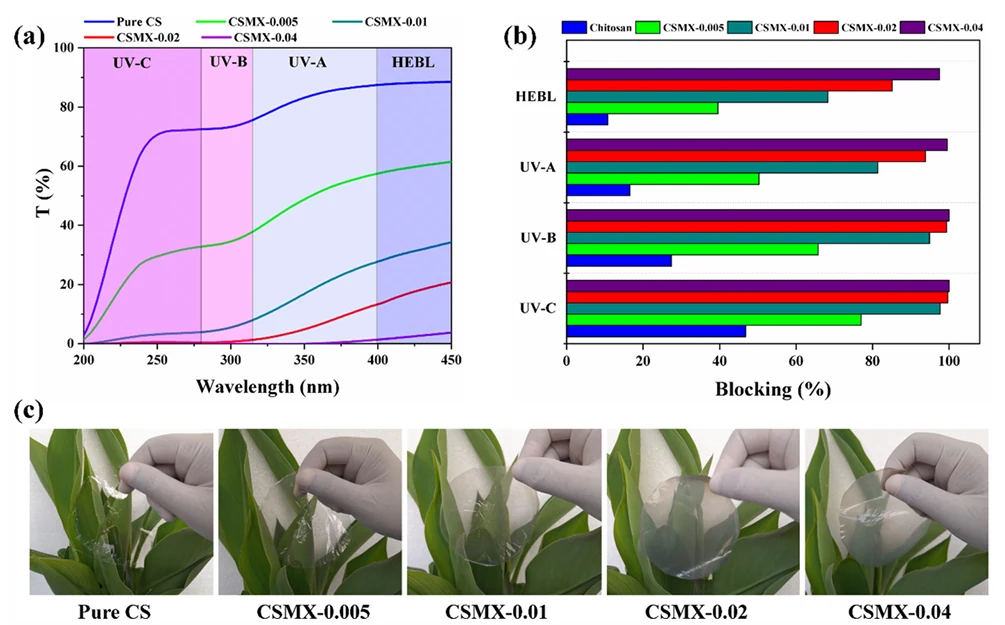
Panel (b) is tempting: the highest loading, CSMX-0.04, blocks nearly 100% of UV-C and UV-B and about 99.5% of UV-A. Panel (c) shows the price: every step up in MXene makes the film visibly darker, and at 450 nm its transmittance falls from about 88% for pure chitosan to a few per cent.
For packaging where customers need to see the food, a middle loading may be the better product. CSMX-0.01 already blocks most UV-C and UV-B and stays far clearer. Decide what the film is for, then pick the loading. A useful habit when reporting UV shielding: compute blocking per band from the transmittance spectrum (usually 100 minus the average transmittance across the band), so the reader can compare UV-C, UV-B, UV-A and blue light separately.
5. Casting is half the experiment
Solution casting looks simple: pour, dry, peel. Most defects come from this step.
- Bubbles from stirring and sonication become pinholes. Let the solution rest or degas it before pouring.
- A tilted surface gives a wedge-shaped film whose thickness, and so its UV blocking, changes from one edge to the other. Use a level.
- Drying too fast traps stress and pulls MXene toward the edges. Slow, even drying at a mild temperature gives a uniform film.
- Thickness controls nearly every property you will measure. Cast the same volume into the same area every time, and measure thickness at several points on each film.
6. Condition the films before you test them
Chitosan absorbs water from the air, and water plasticises it. The same film can test stiffer on a dry day and softer on a humid one. Store films at a fixed humidity for a set time before mechanical tests, and test all your samples under the same conditions. Our CSMX films reached a tensile strength of 19.7 MPa and a Young's modulus of 81 MPa. Numbers like these only mean something when the conditions behind them are stated.
7. Prove the application, not just the material
Spectra and tensile curves describe a material; packaging has to work as packaging. That is why our study went further than characterisation:
- Biodegradation: soil burial, where the CSMX-0.04 film degraded almost completely within seven weeks.
- Antibacterial activity: inhibition zones against Staphylococcus aureus and Escherichia coli.
- Fruit storage: a test that showed the films extend shelf life.
Each test answers a question a food technologist would actually ask. Plan these application tests at the start, not after the characterisation is done.
The short version
Use fresh MXene, respect HF, add MXene slowly, choose the loading for the application, cast carefully, condition before testing, and finish with a test that proves the use. And write down everything, including the batch date, sonication time, drying temperature and room humidity. The variable you did not record is always the one that matters.
Questions, or making a similar film yourself? Get in touch.